Pre-puppy, when life was (relatively) calm, I finally got back behind the sewing machine. I haven’t done anything since my skirt attempt a few months ago, and since that went (relatively) well I decided to test my skills and do something that totally frightened me: A Pattern.
Now, patterns are frightening in a myriad of ways. First, the instructions. They read like freaking Greek. Second, the laying out process. What direction does it go? What does a fold have to do with it? What on earth is nap? And finally, there is the inevitability of having what I made look absolutely NOTHING like the picture on the front of the pattern. But I faced my fears and lived to tell the tale.
I went shopping at Hobby Lobby (aka the greatest store EVER) during a ninety-nine cent sale awhile back and came home with what I thought were going to be easy patterns. It even had the word “easy” in the title! Turns out….not so much.
I called my mom in defeat, who very kindly searched patterns online until she came up with a list of beginner patterns that she thought I should start with. Back to Hobby Lobby I went (patterns were still on sale!) and came back laden with patterns, fabrics, and “notions”, a sort of catch-all word referring to anything that isn’t fabric.
I was enthusiastic, but still nervous. All pattern instructions operate under the assumption that the user has some basic sewing knowledge. Which I don’t. It’s written in an obscure Sewer’s Code for which I don’t have the cipher.
I Googled frantically, searching the Web and YouTube for SOMETHING to break this thing down for me, but alas, my quest was a failure. I would have to rely on myself (and my mom, via phone). I painstakingly went through the process, line by line, until I had my Eureka moment: I broke the code.
Just in case I can save somebody else the same heartbreak and woe that I went through, I’m going to walk you through the pattern the way that I did. Now, I could very well have done this COMPLETELY the wrong way (and if I did, somebody please tell me), but in the end I did end up with a wearable garment! It’s not “Project Runway” ready or anything, but it’s a start.
Here’s what I did:
I bought Simplicity pattern 2228, which is a pillowcase dress. On the back of the pattern, it has a chart telling you how much fabric and what not you’ll need for whichever size you’re making. For instance, I made it a size 7, which means that I used 7/8 of a yard of fabric for the main piece of the dress, and 5/8 yard of different fabric for the contrast band along the bottom. I also needed thread, 2 3/8 yard of 5/8″ wide ribbon, and a package of 7/8″ wide single fold bias tape. I’ll get to the bias tape thing in a minute, but it’s ridiculously confusing. Hint: it’s over by the thread. Last freaking place that I looked.
Okay, so the first thing you do is pull out the pattern pieces and cut them out for the size that you want them to be. Just follow the little black lines; this is the easy part. The instructions say to press the pattern pieces with a warm, dry iron, but honestly I skipped that part. In retrospect, I probably should have done it. Also, make sure to pre-shrink your fabric by washing, drying, and pressing it. One thing I’ve learned about sewing is that it makes you VERY familiar with your iron! In some cases, too familiar, as is evidenced by this loveliness:
But I digress.
Now take your nicely pressed fabric, and fold it like the little diagram in the instructions. Then lay your pattern piece with the arrows pointing right to your fold, pin it, and cut it out. Next, take your pattern piece, flip it over, and cut it on the fold again. I know that I’m not explaining this part very well. It’s really better if you can see it. Do the same with the contrast band piece.
Once you have everything cut out, it’s time to start sewing!
Step 1: Sew the front to the back at the side seams, making sure that you’re sewing the fabric with the RIGHT SIDES together – the wrong side of the fabric will be facing out.
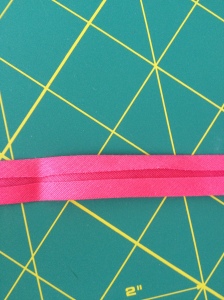
Step 2: Break out that bias tape! Here’s what the package looks like:
I got pink, to kind of match my fabric, but I really don’t know if the color matters or not. It’s going to be folded like this:
Now what you have to do is UNFOLD it and press it flat. Next, fold the tape in half, lengthwise with the raw edges even, and press that flat.
Step 3: Take your dress and spread it out at the side seams with the RIGHT side of the fabric facing you. You want the armhole to look like a big “U”. Now pin the bias tape to the armhole edge, trying to keep the raw edges even. Sew the tape onto the armhole with a 3/8″ seam. Trim the seam, and clip the curves (this was a tricky part for me – turns out curves are harder to sew than straight lines). Repeat on the other armhole.
Step 4: Turn the tape over to the INSIDE (wrong side of fabric); press it and pin it. On the OUTSIDE (right side of fabric), top-stitch the tape. Repeat on the other armhole.
Step 5: Keep that bias tape handy, because we’re using it again! Get a piece that still has the weird little fold on it – like this, remember?
Now open out just one of the edges and press it.
Step 6: Next, we’re going to make a casing for the neckline of the dress. With the RIGHT sides of the fabric together, pin the tape to the upper edge with the raw edges even. Turn it under when you get to the armhole on each side. Stitch in a 3/8″ seam.
Step 7: Fold the fabric over to the INSIDE of the dress and press it. See? It’s like a hem or a waistband because now you’ve got a little casing. Pin it, then stitch close to the inner edge (make sure you’ve got enough room to slide in that ribbon!). Do the same on the other side of the dress.
Step 8: Cut the ribbon in half for the ties. Insert the ribbon through the front and back casings, making sure that the ends extend evenly (you’ll tie them in bows at the shoulders when it’s worn). It’ll look like this:
Step 9: Time to get out that contrast band! This part was really confusing for me, so I have no idea if I did it the right way or not. You’re going to stitch the front part of the band to the back part of the band at the side seams. Fold the band in half lengthwise with the WRONG sides together, having the raw edges even. Press it and pin it (the instructions say to “baste”. I have no idea what that means. In my little world, it means pin).
Step 10: On the OUTSIDE of the dress, pin the band to the lower edge of the garment, matching the centers and side seams. Stitch the seam. Stich again 1/4″ away from the first stitching. Press seam toward the garment, pressing the band down.
Step 11: On the OUTSIDE, top stitch the front and back close to the seam.
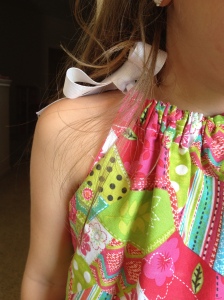
And voila! You have something that is actually wearable, albeit way too large in my case. Here it is:
I may even try to re-use the pattern and making matching dresses for the other two girls. Eventually.


